Chosen Variables Listing Report
These instructions describe how to create a Chosen Variables Listing Report. A chosen variables listing report will print out selected patient fields from cases in a subset. If you would like to see instructions on Creating a new Subset click here.
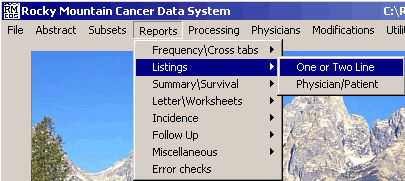
From the RMCDS Main Menu Click on Reports > Listings > One or Two Line
This will bring up the Listing report window.
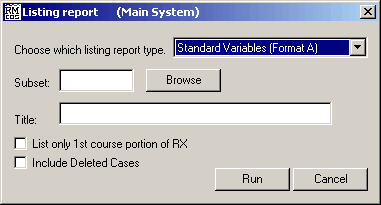
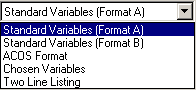
The first line in this window is labeled Choose which listing report type. The input box has a pull down arrow. Click on the pull down arrow and select Chosen Variables.
After selecting Chosen Variables, enter the name of the subset that you want to use to create the Chosen Variables listing report. Type the name of the subset into the box labeled Subset:. If you want to search through a list of available subsets, click on Browse.
You can give this report a title by entering text in the box labeled Title:. The title is optional.
After you have selected Chosen Variabes , entered a subset name and a title, click on Run. This will open the Chosen Variable Listing window.
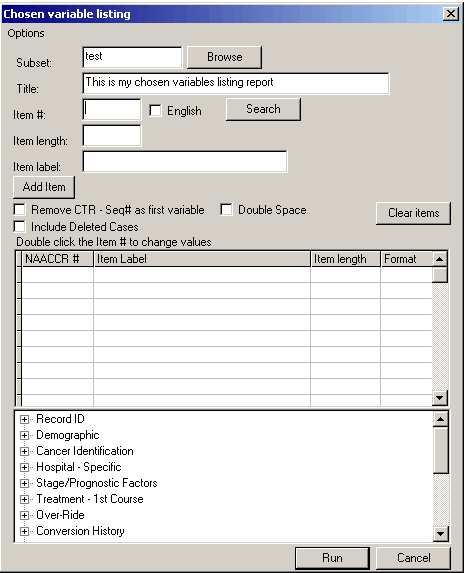
At the top of the window is an Options menu. Clicking on Options will bring down the follwoing menu.
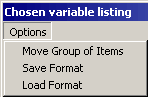
If you want to load a pre-defined list of items, you could click on Load Format. This will bring up a window with available files to select from (note: if you have not saved any Chosen Variable format files previously, you will not see any files listed). You can also save the Chosen Variable format after it is defined by choosing Save Format from the Options pull down menu. If you use a particular format frequently it is a good idea to save the format for future use.
The first two lines below the Options menu are labeled Subset and Title. If you entered a subset name and title in the previous window these values will already be filled in. If you have not yet entered valued into these boxes, please do so now.
The next four lines are used in selecting which variables you want to have listed in thes report.
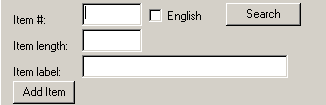
In the box labeled Item # you will enter the number for the first variable in your listing report. The items in your Chosen Variables Listing report will appear in the order you enter them in this window. (Note: All chosen variable reports will automatically have ACCESSION NUMBER as the first data item on the printed report. If you want to remove this as the first variable put a check in the box labeled Remove CTR-Seq# as first variable.) There are several ways to select the item #, if you know the item number that you wish to use, type it into the line labeled Enter item #. If you want to search for the item number, click on Search. This will bring up a Search for Data Items window.
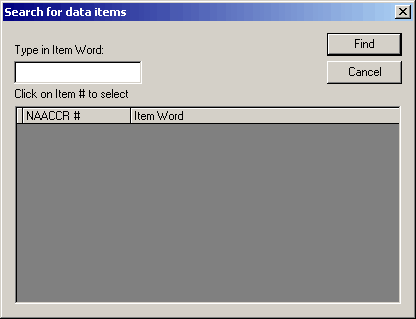
In the box labeled Type in Item Word: enter all or part of the variable you want to use, and click Find. (For example, if you wanted to include Race in your listing report, you would type in the word Race and click Find.) All of the available matches to your search will appear in the box below.
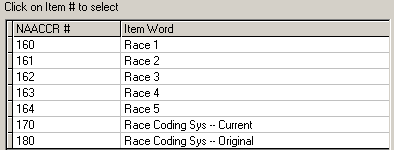
Double click on the NAACCR # of the variable that you want to use. The window will close and you will return to the Chosen Variable Listing window. The Item # that you selected on the search window will be in the Enter Item # box.
You can also use the tree structure at the bottom of the window to locate variables.
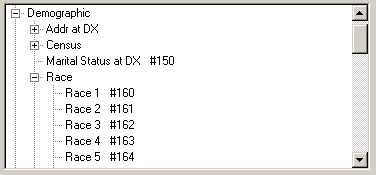
Expand the sections the tree sections by clicking on the + symbol next to the labels. When you find the variable that you want to use, click on it and the Item # will automatically be entered in the Enter Item # box. Notice also that the item numbers are listed next to the variable name for your reference.
After you select an item number, you have the options to use the English vaules for the code and to modify the default values for Item Length and Item Label. If you want to use the English re-code for a variable (Such as MALE and FEMALE instead of 1 and 2) put a check in the box labeled English after you select the Item #. (Note: The English re-codes will take up more space on your listing than the numeric code but will usually be easier to read after the report is created.)
The Item Length box allows you to set the number of characters that will be printed out on the listing report for that item. For example, if you only wanted 15 letters of the PATIENT NAME displayed, you would change the default length on PATIENT NAME from 25 to 15. To the right of the Item Length box there is a prompt telling you what the Availabe Length for this listing report is. The report starts out with 120 characters available and as items are added the Available Length decreases by the length of the item added. (The length limitation is in place due to paper size restrictions, there are only 120 printable columns available for this report on a standard piece of paper printed in landscape mode.)
The Item Label is what will print out at the top of the report as the label for that column. You could change the Patient Name Label to be just Name. To do this, simply click on that line and edit it accordingly. (Note that the Item label can only contain as many characters as the value in Item length.)
Once the Item #, Item Length and Item Label fields are filled in, click on the Add Item button. This will add that item to the variable Selection Table.

You can continue to add items in this manner until you have finished entering all of the desired variables for your listing report, or until you run out of Available Length for the listing.
If you need to modify or delete an item that has been added to the Selection Table, simply double click on that item number. A Change Value for Listing window will appear and you have the ability to modify the Item #, length, and Label.
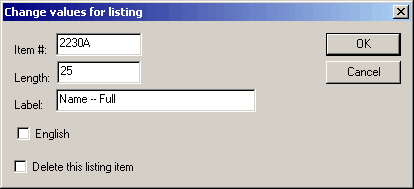
If you want to delete this item from your list, put a check in the box labeled Delete this listing item. If you want to change this to display the English recode, put a check in the English box. When you are finished modifying the criteria, click OK to close this window and return to the Listing Report Window.
There is the ability to save the selected criteria and also to load criteria that has previously been saved. To do this, click on Options at the top left of the window. This will give you a pull down menu allowing you to save format or load format. When you click on Save format, you will see a standard save window come up. The default location to save criteria files is in the sfiles directory. Type in the name of the file to be saved and click Save. The file will be written and the save window will close. Loading criteria files is similar to saving them. Clicking on Options Load format will bring up a window defaulting to the sfiles directory. Choose the criteria file that you want to load and click on Open. This will return you to the Listing report window with the loaded format listed.
If for any reason you want to remove all items from the Selection Table you can click on the Clear Items button at any time.
You also have the options to Remove CTR - Seq# as first variable, Double Space, and Include Deleted Cases. If you want to use any of these options, put a check in the appropriate box. (Double spacing the report will give you a blank line between every patient and can make the report easier to read. It will also make the print out longer.)
After you have completed entering all of the items for your Listing Report, click on the Run button at the bottom of the window.
The program will generate the listing report and then bring up the print options window.
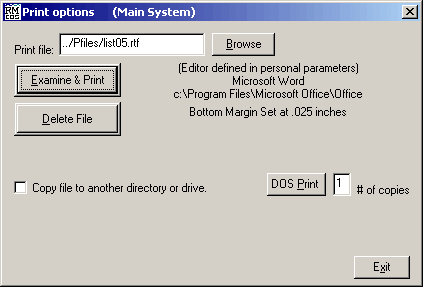
This window gives you the options to Examine & Print,and Delete File, the listing report. Click on Examine & Print to open the report in the editor defined in your personal parameters. From the editor you can view and print the report.